Welcome to AzkananProjeear's quick-guide to Haven and Hearth. I'm going to tell you what the menus are and what they do, and give you a quick guide on starting up.
Please make sure you read it all in order and don't skip, otherwise you're likely to duck yourself over.
I'll type the essential stuff in black, and the "additional" information in a beige colour.
You should just read the black for now, then go over it again and read the beige, if you're in a hurry.
Contents
- Main UI (User Interface)
- - Health, Damage and Restoring it
- - Stamina and its effects
- - Hunger and its Endless layers
- - Happiness
- - Travel Weariness
- The Dial
- - Inventory
- - Equipment
- - Character Sheet
- - - Abilities
- - - Skills
- - - Personal Beliefs
- - - Worship
- - Kin
- - Options
- FEP (Food Event Points)
- LP (Learning Points)
- The Buttons
- Starting Up
- - Controls
- - The Aim of The Game
- - The Guide
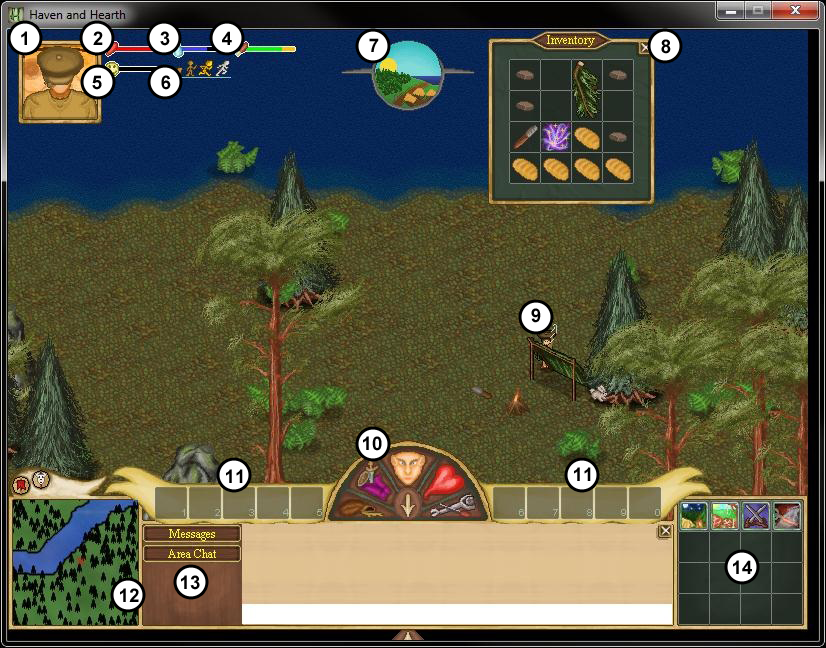
1. Your Portait
2. Health
3. Stamina
4. Hunger
5. Happiness
6. Speed
7. Time
8. Inventory Window
9. Your Character
10. The Dial
11. Quickkeys
12. Minimap
13. Chat Filters
14. Icon Menu
===========================================
Main UI
On the User Interface, There's quite a bit of stuff; let's start at the top left, with that portait. That's you. When you equip certain items, you're portrait will reflect it (Your character, too) this is called "Paperdolling" in the terms of the programmer.
===========================================
Health, Damage and Restoring it
The Heart is your health bar. It should be all red, which means you're as fit as a fiddle. There are two colours in your health bar, red and orange. When you are damaged, your red bar will decrease and will then heal up slowly - this is know as the SHP (Soft Health Points).
When your SHP hits 0, your "HHP (Hard Health Points) will decrease.
Your Soft HP will only restore as far as your Hard HP is, so if your soft HP hits 0 several times, your going to be in bad shape. When you hit 0, you'll get knocked out, indicated by a fallen character, and a whizzing "stars" around your head. you'll get up after a minute or so.
Now, the main way to heal your HHP is to take some first aid and fix yourself up, but you need some "Gauze" to do that. Which can be a bitch to get, so, for now, take the easy path and walk about in a Marsh or some Shallows for a while.
After a moment or so, you'll see "Leeches" on your equipment screen slots. These will drain your Soft HP by 3 and have a 10% chance to restore your HHP by 1 - be careful not to get knocked out by them or you'll lose a portion of your health.(sp)
The leeches will then be "Bloated" and make for easily-gathered fishing bait, later on.
===========================================
Stamina and its effects
Stamina is the water-droplet image, the blue bar. Some tasks will drain your stamina over time, some moreso than others. As it decreases, you'll be forced to move to a slower movement and your hunger bar will decrease faster.
"Running drains no stamina on paved ground, and only drains stamina on forest terrain." - Noka
Naturally, your stamina will increase if you take a rest, moreso if you sit down on a chair. Stamina can be quickly increased by drinking water from a waterskin or flask. The quality of the water will affect how much stamina is restored and in turn will decrease your hunger accordingly.
===========================================
Hunger and it's endless layers
Hunger. The chicken leg with the green bar. The green bar is nearly empty?! Oh no! I'm going to die!
This is the usual reaction from uninformed newbies. Contrary to dispopular belief, your Hunger bar will deplete several times, each time slower, before you die of starvation.
Overstuffed
Full
Hungry
Very Hungry
Starving
Overstuffed
This is where you and your fat ass ate too much, and now you can only walk at "Crawl" speed. Don't be so greedy.
Full
This is when you have played your cards right and have eaten well. Good job.
Hungry
This is where you should be whilst you're working or too busy to go eat, don't worry about it.
Very Hungry
This is when you should begin to make plans to go eat. This goes down pretty slowly, but it takes alot of food to refill if it really depletes.
Starving
I've never reached this stage, but I know it's the last bar stage before you die of starvation - avoid it.
"Starvation ticks off at your HHP, or the HP that, without being healed, will kill you. I don't remember by how much, but starving at all is badnews." - Noka
To quickly grab some food, look around for some Ant Hills. Ant Hills give random ants; Larvae, Pupae, Aphids, Soldiers, Queens and Empresses. For hunger, you're looking for the Larvae, Pupae and Aphids. Save the Soldiers, Queens and Empresses for Study - I'll go into this later.
To hunt for ants safely, do this;
First, you need the Hunting Skill. Once you find an ant hill, there will likely be three groups of ants moving around, guarding it. Right click the hill, Raid it. When the ants lock onto you, run for nearby shallow (water)s.
- When the Ants arrive, they will reach the bank of the shallows, look at you for about two seconds, then wander around again. You are now safe to raid the hill without them attacking you.
- If there are no shallows, just run away, wait for them to catch up, then circle around and raid the hill. If they catch up, you can either stick it out, or try and circle around again.
Larvae: 10 Hunger + 1 Agility FEP
Pupae: 10 Hunger + 1 Constitution FEP
Aphid: 10 Hunger + 1 Agility and 1 Perception FEP
Soldier: 10 Hunger + 1 Strength FEP
Queen: 10 Hunger + 1 Strength, 1 Intelligence, 1 Constitution and 1 Perception FEP
Empress: 10 Hunger + 5 Dexterity and 4 Psyche FEP
As you can see, all ants give a measely 10 Hunger. However, if you were to receive 2 (on average) ants per ant hills, and you raided four, thats (2*4)*10 Hunger, ie, 80 Hunger filled. When raiding an Ant Hill, you'll gain the type and amount of ants at random. Sometimes you'll receive none, sometimes you'll receive three soldiers, two aphids and an Empress. Unlikely, but possible.
Make sure you have at least five empty tiles in your inventory for the ants, when you raid. Otherwise they are dropped and escape.
===========================================
Speed
At the top left, there are little images of men moving, there should be four. The faster you move, the quicker your stamina will drain, and in turn the hungrier you'll get.
Crawl
This is when you are either lifting or pushing something or very tired, you move at half the speed of walking.
Walking
This is a leisurely pace, where you can move on your way and take in the scenery. It doesn't drain your Stamina.
Running
This is when you are in a rush and you're running about. It drains your stamina, so don't use it too much or you'll be tired all the time.
Sprinting
This is the fastest you can run. It drains your stamina incredibly quickly, so don't use it unless absolutely necessary.
Happiness
Ignore this. You're happiness means nothing.
Namely because it's a placeholder, which means it's for the future, and has no effect right now.
===========================================
Travel Weariness
"Travel Weariness is basically how far you can quick travel. It's not a big deal until you get into cross-town commuting, since a full bar completely stops you from quick travelling (except for to your hearth fire). The ways to get rid of it are to:
- sleep in a bed (it's affected by the quality of the bed, ie a bough bed removes less than a sturdy bed, over time.)
- drink alcohol
- chew tobacco" - Noka
===========================================
The Dial
The dial is that little selection of buttons on the top of that bar at the bottom of your screen. Yeah, that one, with the five icons.
===========================================
Inventory Shortcut: "Tab"
The inventory is the button, with the little leather bag for an image, on the left of the dial and is where everything you are carrying is viewable.
"It" means an item.
Left clicking will select it, and drop anything you've selected.
Right clicking will interact with it, if possible.
Shift-left clicking will auto-transfer it to another open window, such as a construction site or container.
Ctrl-left clicking will drop it on the floor - doing this in water will make it dissapear. Be careful.
===========================================
Equipment Shortcut: CTRL + E
The equipment is the next button on the dial and is where all your equipped items are, and any attached leeches acquired from too much time in the marshes or shallows.
To equip an item, left click it in your inventory then left click your body on this screen.
To unequip an item, shift-left click its image in the boxes around your character.
===========================================
Character Sheet Shortcut: CTRL + T
This is a bombload of information all about your player and there are four screens to it! When you open your character sheet, the "Abilities" will be the one to automatically open.
===========================================
Attributes
There are eight attributes altogether, and they all affect your character differently.
On how to increase your Attributes, read about FEP (Below).
Strength
Strength affects how much damage you inflict when you punch, stab or slash somebody, or something. Anything melee you do, that is related to damage, is controlled by this damage-wise. Other things also affect Damage in Melee, but this is your "Base" damage controller.
When you are destroying things (Adventure > Destroy), Stone Axes add +1 to your Damage, and Pickaxes add +2. Your damage is calculated by Sqrt (Square Root).
In Conjunction with the Smithing skill value, Strength affects the quality of objects crafted with Metal Working and Steelmaking.
Easy Strength Food: Boar Meat, Pumpkin Flesh, Ant Soldiers and Brill.
Hard Strength Food: Midnight Blue Cheese, Brodgar Blue Cheese, Big Bear Banger.
Agility
Agility affects your Travel Weariness capacity.
Agility decreases an opponent's minimum ranged damage (cross-checked against their perception).
Having higher agility than an opponent decrease the time you have to wait inbetween when you can attack, whilst increasing your opponent's wait time ("Cooldown").
Easy Agility food: Rabbit Meat.
Hard Agility food: Ring of Brodgar, Delicious Deer Dog.
Intelligence
Intelligence affects how much "Attention" you have for Study of "Curiosities" (Read about LP Below).
Intelligence affects your "Authority" gain in conjunction with Charisma (You don't need to worry about this till you have built a Village Claim).
Intelligence, in conjunction with Stealth, determines the visibility and quantity of "Scents" you leave behind when you commit criminal acts. (Again, you don't really need to worry about this till the future, when you have Criminal Acts (Exception of Trespassing on people's "Claims")).
Easy Intelligence Food: Perch, Blueberries
Hard Intelligence Food: Jorbonzola, Blueberry Pie
Constitution
Constitution affects your Maximum Hit Points.
Constitution affects the Stamina Cost of Swimming. *Do not Buy This Skill. You Will Die When Using It.*.
Easy Constitution Food: Beef, Ant Pupae.
Hard Constitution Food: Cow Chorizo, Pumpkin Pie.
Perception
Perception affects chances of finding foragable objects on the ground (Important!).
In Conjunction with Exploration, determines the visiblity of foragable objects and the detection of criminal Scents by "Ranging" (skill).
Affects the quality of unbaked goods. Dough is soft-capped by the square root of your Perception * Cooking.
Easy Perception Food: Carrot, Plaice, Boiled Egg, Deer Meat
Hard Perception Food: Lamb Sausages, Carrot Cake
Charisma
*Charisma is mostly used for more advanced players, later in the game*
Charmisma affects leadership-related combat skills, affects your Authority Gain in conjunction with Intelligence and you required 25 Charisma to become a Chieftain of a village.
The only thing you as a newbie player might need charisma for at the start is by how many people are allowed in your party, that is if you start with a large community. Charisma controls this.
Easy Charisma Food: Grapes, Mutton, Raisins.
Hard Charisma Food: Harmesan Cheese, Raisin Butter-Cake.
Dexterity
Dexterity affects the quality of of objects crafted with Pottery.
Dexterity, in conjunction with Sewing (Skill Value), affects the quality of objects crafted with Cloth Making and Leather Working.
Dexterity plays a role in the quality of the Rock Lobster Lure.
Easy Dexterity Food: Chicken Meat, Chantrelles, Roach.
Hard Dexterity Food: Chantrelle & Onion Pirozhki, Beeted Bird Breast.
Psyche
Psyche is easily the hardest Attribute to increase, considering so few foods increase it.
Psyche, in conjunction with Smithing, affects the quality of Jewelry.
Psyche affects the crafting of specific items, such as Bear Tooth Talisman.
Pysche affects the crafting of silk-related items.
Easy Psyche Food: Sturgeon, Rat-on-a-Stick, Ant Empress.
Hard Psyche Food: Butter-Steamed Cavebulb, Ring of Brodgar.
Q. So, what should I raise first?!
A. Well, whilst the most important thing to raise first is your ability to find "Curiosities", these earn you LP, you will also need space in your study to put them into.
Everybody has their own play style.
But, for me, I earn at least 20 Intelligence when I start, and use my Exploration Skill Value for finding things.
===========================================
Skills
Here you can buy base skills that you will definetly need to acquire throughout the game, and view skills you already have. Clicking them will give information about the skill and what it does for your character and will show the LP Cost next to the "Learn" button.
===========================================
Personal Beliefs
This is where you can set the beliefs of your character - don't touch it! Keep reading first.
You can only change these by one step every X hours. Once you buy a point, you can view how long it will take for the next purchase to be available by hovering over the now-grey banner at the top of the window, which also turns green when you can purchase.
It is advisable to put your points first into "Peaceful" which will increase how many Learning Points you recieve for everything you do that LP-related.
You can view a list of their effect Here.
===========================================
Worship
Ignore this for now. Read about it on the Wiki later in the game.
===========================================
Kin Shortcut: CTRL + B
The Kin is the love-heart button. You can add new friends here, view your current ones and quickly see their online status.
In the left text box, you can write up a secret.
Do not keep this secret in there all the time. Only write one in, when friends need to join the game, at your location.
If you do keep the secret in there all the time, people can easily guess it, spawn at your settlement, and destroy everything.
When you want to make friends with people at long-distance, give them this secret and they will then be your friend, or "kin". It is preferable to right click the person, "Memorize" them, then right-click "Add Kin", as this is far safer than giving out your Hearth Secret.
Telling the wrong person may get you killed. I cannot stress this enough.
Likewise, if somebody gives you their secret, type it in the right text area next to the one you make your own secret in.
Left clicking a person's name in your friend list will give some quick information on them. The candle next to their name on the list is their online status - a lit candle is online, whilst an unlit candle means offline.
However, if somebody dies, their candle will stay lit for a while.
===========================================
Options
This you won't really need to know, but here's a quick run down;
General
(I'm using Ender's Client, so I can't tell what options are new from the Original Client. My apologies).
Camera
Here you can change your camera style.
I suggest "Freestyle", which is default, for moving around on foot.
I suggest "Pan-o-rama" for boating, it's easier and quicker.
If you do not have a Middle Mouse Button, for Freestyle, I suggest Pan-o-rama.
Audio
Here you can set the volume and select if you want music on or off (There is currently no music available on the Vanilla client)
* Vanilla means the default, the uneditted and/or the unmodded. It's the official client.
===========================================
The Action Buttons
There are four buttons at the bottom right of the screen, in a little RTS-game-like fashion.
Adventure
This holds special actions such as making fires, hearthfires, lifting, stake claim and so forth. You should probably click-drag lift and a couple of others to your quick keys to save time in the future.
Build
This menu holds stuff that needs to be built via construction site, such as boats, houses, carts and so forth - I don't want to ruin them all for you - discover them!
Combat
This menu is combat-related. It holds Attacks, Maneuvers, Moves, Special Moves, Quell The Beast and Shoot, in the main menu of it.
I highly recommend the following link for learning on how to fight. It's some good shit.
Kudos to Dataslycer
Combat Guide
Craft
Craft holds everything that is built without requirement of a construction site, such as cups, food, amulets and other such things that go straight to your inventory once completed.
===========================================
Food Event Points
Food Event Points are earned by eating food. For example, an Ant Larvae gives +1 Agility "FEP". If you kept eating Ant Larvae till your "FEP Bar" was filled, you would have earned 100% of +1 Agility Attribute, causing an increase in Agility. However, now that your agility is your highest statistic, it also sets the maximum FEP required to fill the FEP bar, from 10 to 11.
If your FEP Bar was still at 10 FEP required, and you ate 5 Ant Pupae and 5 Ant Larvae, your bar would be filled at a ratio of 50% Agility and 50% Constitution. This is then a coin-flip between which attribute raises.
As you go on through the game, you'll come across many, many sources of food. Your FEP Bar requirement actually decreases the more variable food you ate (21% is the initial drop, I think. Don't quote me, though). If you ate Boar Meat and Bear Meat (Both sources of Strength FEP), your bar requirements would still fall.
As you continue through the game, your FEP Bar requirements will increase according to your base highest attribute. If your strength was 78, but you were gaining a +20 Strength from a Bear Tooth Talisman, your base strength would be 58, and that is how many FEP you would need to increase a statistic.(sp) Ergo, it is usually best to try and raise them all equally as you go along to avoid this (Your psyche might still be 10, whilst your Strength is 150. You'd need 150 Psyche FEP to increase your Psyche be one, at a 100% pass rate).
===========================================
Learning Points
Learning points are earned through curiosities. Curiosities are studied in a study. Each curiosity requires Time to study it, takes up a certain amount of Attention and will give a certain amount of LP.
Intelligence = Attention.
32 Intelligence = 32 Attention
You can only study one type of Curiosity at a time.
A curiosity is a certain type of item. They can be foraged or crafted. Examples:
A "Dandelion" is a "Static" foragable that appears in the area you are in, when you enter the area. "Static foragable" means that if you pick it up, you will 100% get it. It will randomly spawn according to Perception*Exploration.
An "Ant Soldier" is a "Random" foragable, meaning that when you forage a place it is from, you will only gain it by chance.
"Cat Gold" is a "Random" event, meaning that you will only gain it by chance, by action, as opposed to foraging for it. Cat Gold appears when mining or chipping at a boulder.
"Seer's Bowl" is a craftable curiosity, meaning that it requires items to craft it. Once crafted, you gain it. Simple.
An Ant Soldier gives 200 LP. Once the timer has run its course (0.67 of an hour), you will gain 200 LP. However, if you have increased your Learning Ability through Personal Beleifs, you also need to take that into account. At a 360% Learning Ability rate, you would earn 200*3.6 = 720.
Quality of a curiosity also plays a role, however, I have yet to work this out. q10 is the default quality that curiosites are based at(sp). However, a q30 curiosity does not mean you will gain *3 the LP (I tested this last night with Auroch Hair).
Learning Points are spent on increasing Skill Values and buying new Skills, as well as expanding Personal Claims and building a Village Claim.
Starting Up
When you first make your character and enter the game, you'll be in a small room with some NPCs. Click each and see what they have to say, then grab items from the chest (Controls below) and choose where you want to go (Also below).
Controls
Left Clicking will move your character.
Middle Clicking and dragging will move your camera (On some camera styles)
Right Clicking will interact with something under your mouse.
Space will minimize/maximise your User Interface.
Inventory + Containers
Ctrl + Left Click will drop the clicked item.
Shift + Left Click will transfer the clicked item to an open container/inventory.
The Aim of The Game
There isn't any set "Best" goal. Most people just do whatever they feel like doing. Maybe you want to be a ranger who wanders the wild near his encampment, living off the land, or maybe you wish to be the mayor of a giant city you settled. The possibilities are quite open to vindification, and it's up to you how you want to play. Map the world, see the world, make friends, become a master craftsman and so forth; all are down to you and your playstyle.
It is likely you will do all of them.
===========================================
Do's and Don'ts
Do run away from bears and boars. They'll Knock you out.
Do be nice. There's no reason for you to be mean in-game - it could cost you a future ally or trading partner.
Do help people. Not all the time of course, but if somebody is dying of hunger, passing by, he could become your best buddy for it.
Don't take the swimming skill. It allows you to swim, but you will more than likely drown.
Don't let your food stocks become empty. You'll suffer for it in the long run.
Don't settle on Riversides. Griefers patrol the rivers like hawks and will likely steal from you or kill you, if they can, just to annoy you. This happened to me the first time.
Don't attack Boars, Bears and Deer. Boars will rape you, Bears will murder you and Deers heal 100 damage every 30 seconds or so.
Don't right click rabbits and chickens from a distance. They'll just get a head start on you and could get away.[/quote]


