Chapter one: Character Creation
Chapter two: Interface
Written by Dennislp3
Key:
Black text = Manual text
Red text = Troubleshooting
Green text = Special note/tip
THIS MANUAL IS OUT OF DATE AT THIS MOMENT! I have returned from a long absence and I am updating this manual ASAP so bear with me while I work out all the out of date material and kinks. I plan on having this updated within a few days Thank you =) (September 30th 2009)
Useful Links:
Haven & Hearth Wiki: http://havenandhearth.wikia.com/wiki/Haven_and_Hearth_Wiki
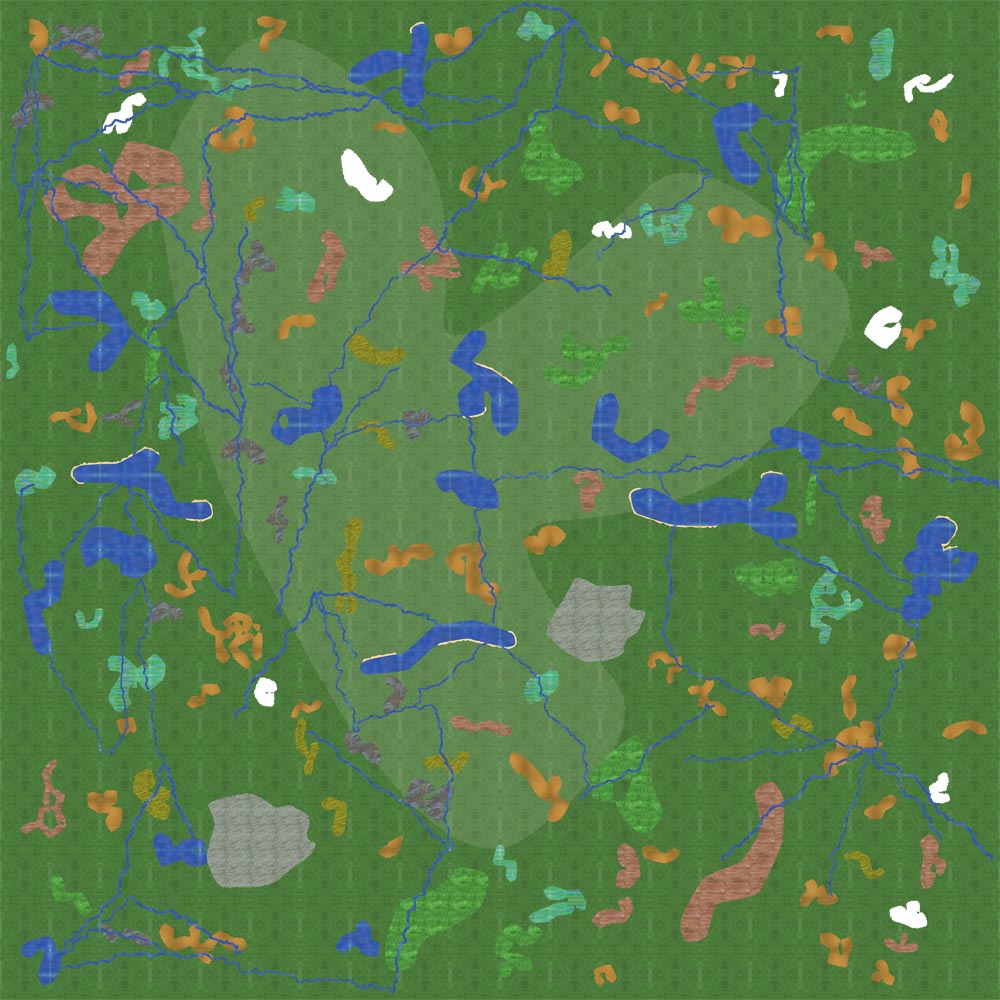
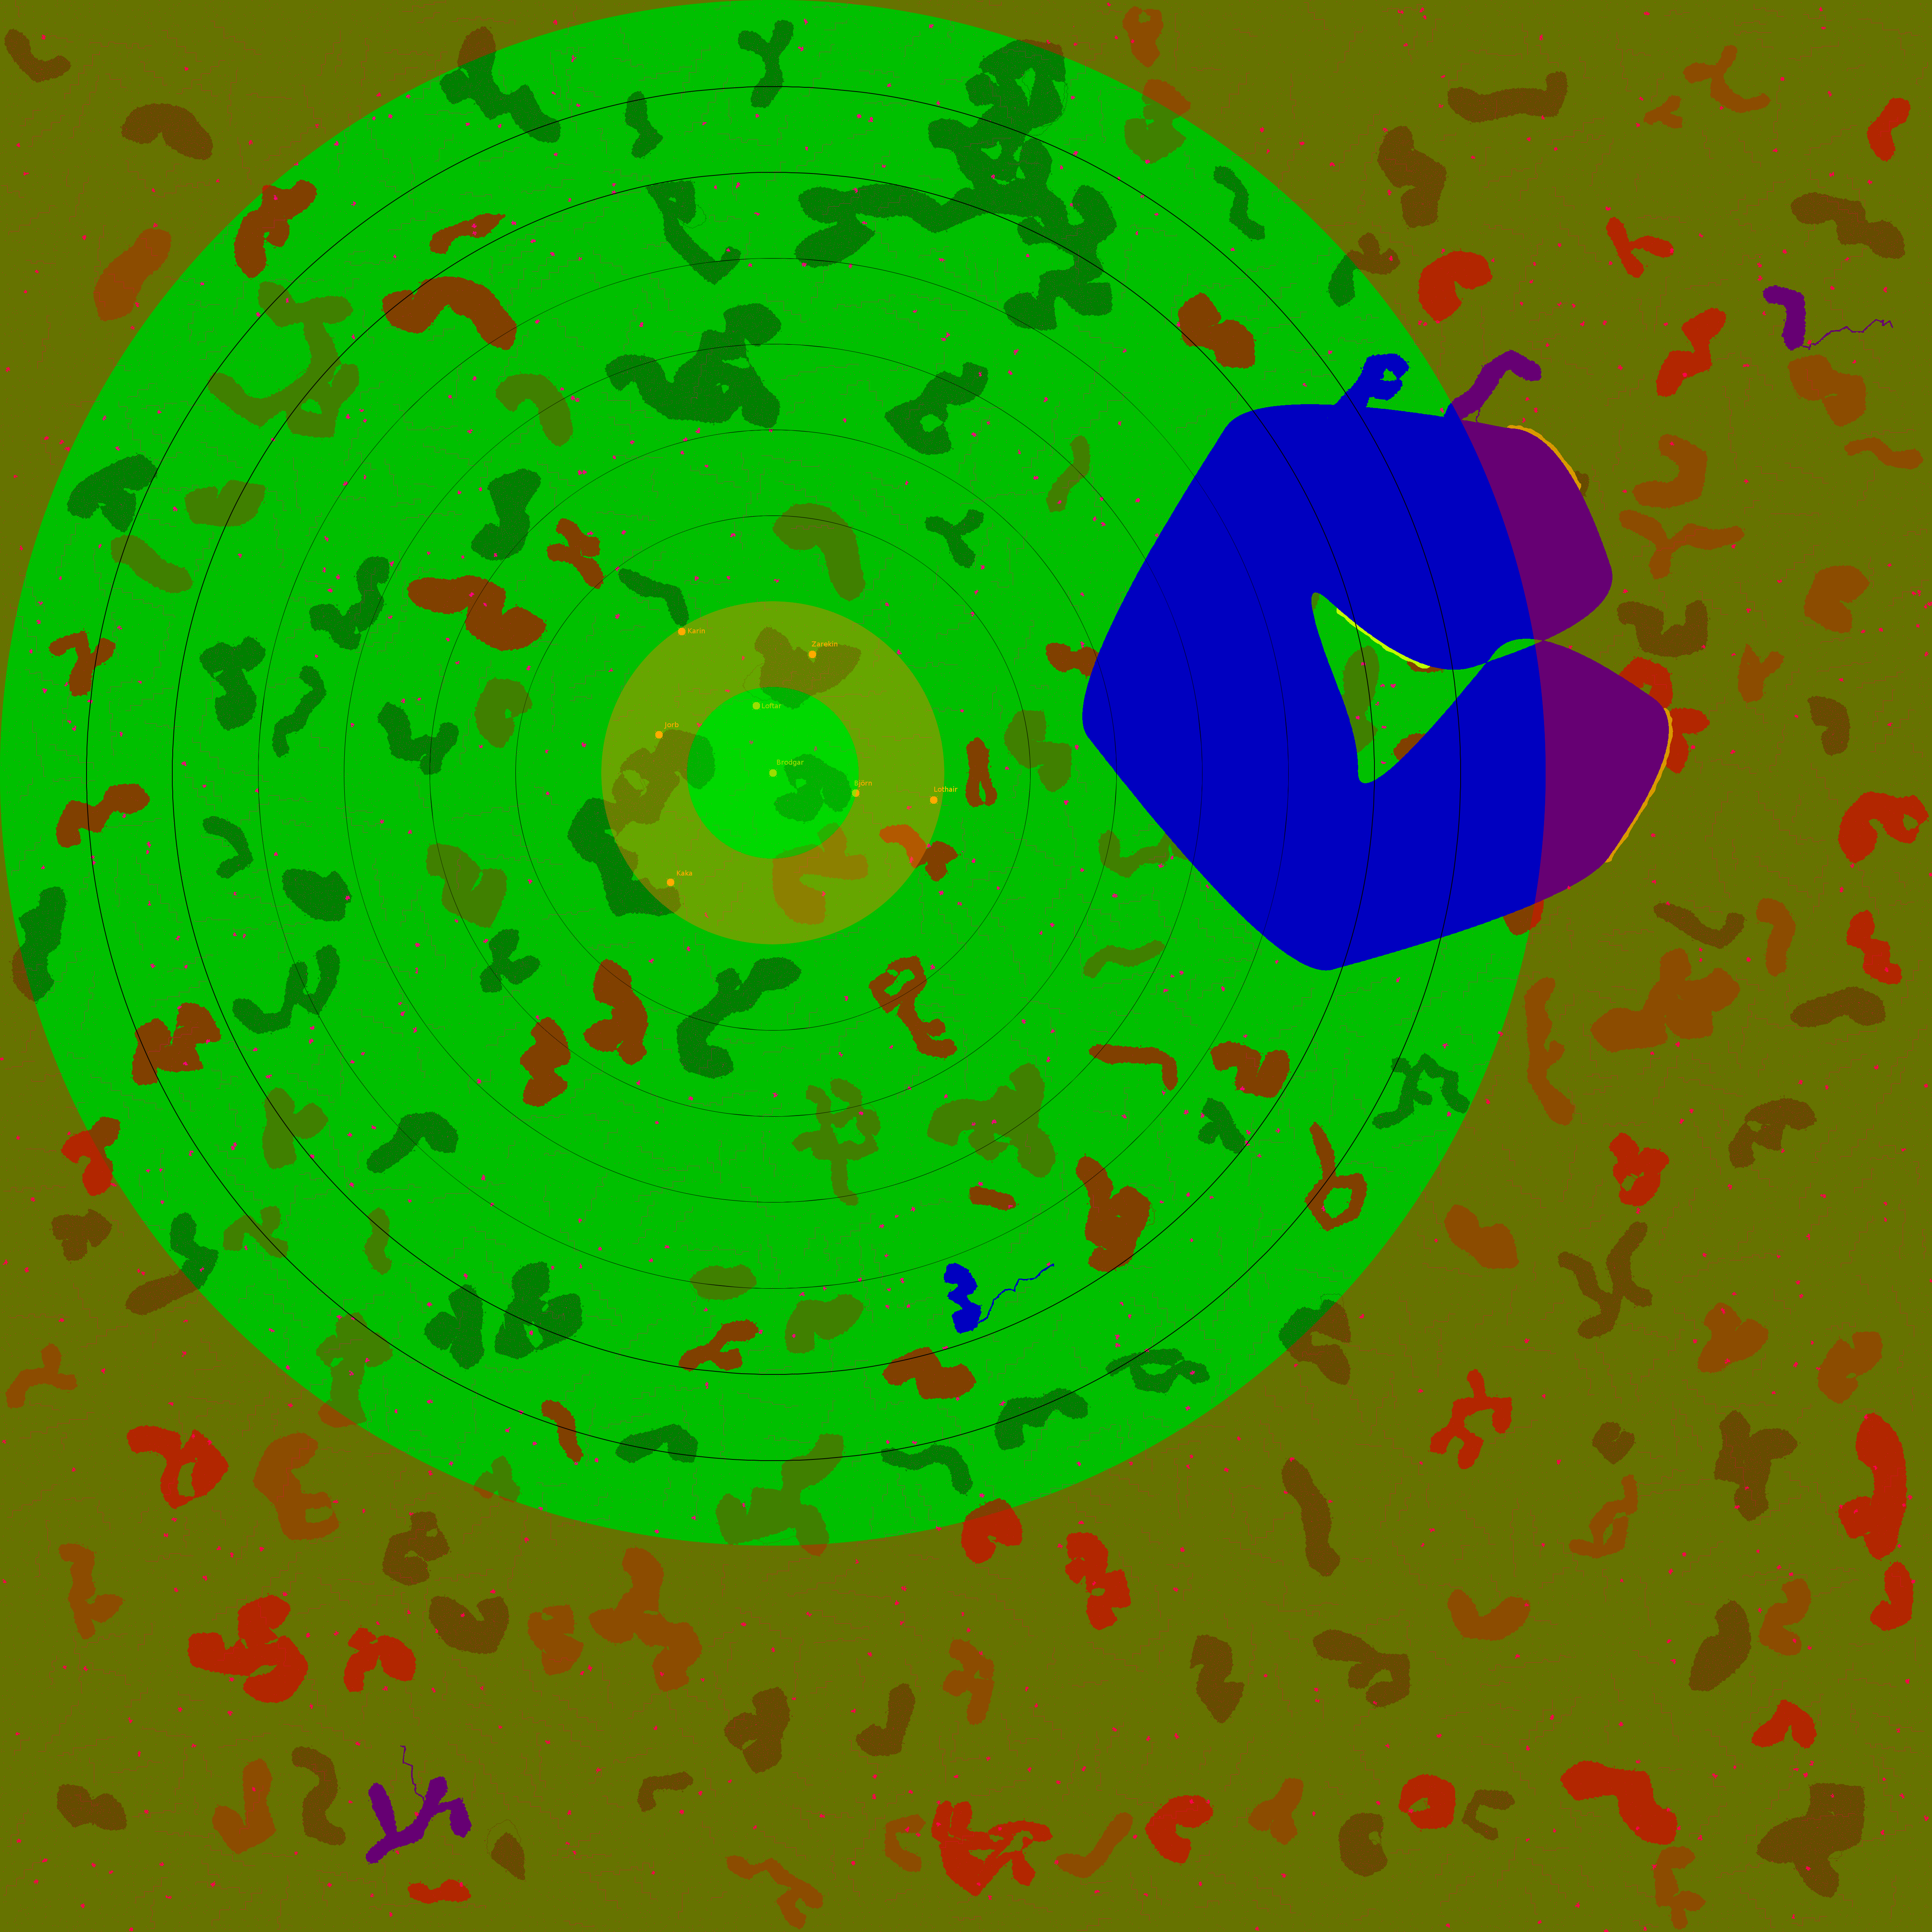
A full map can be found at this link: http://www.fritillaria.se/silverdragon/new-map.jpg
Interactive Map: http://www.maplib.net/map.php?id=6075
A food chart can be found here: http://havenandhearth.wikia.com/wiki/FEP_Table
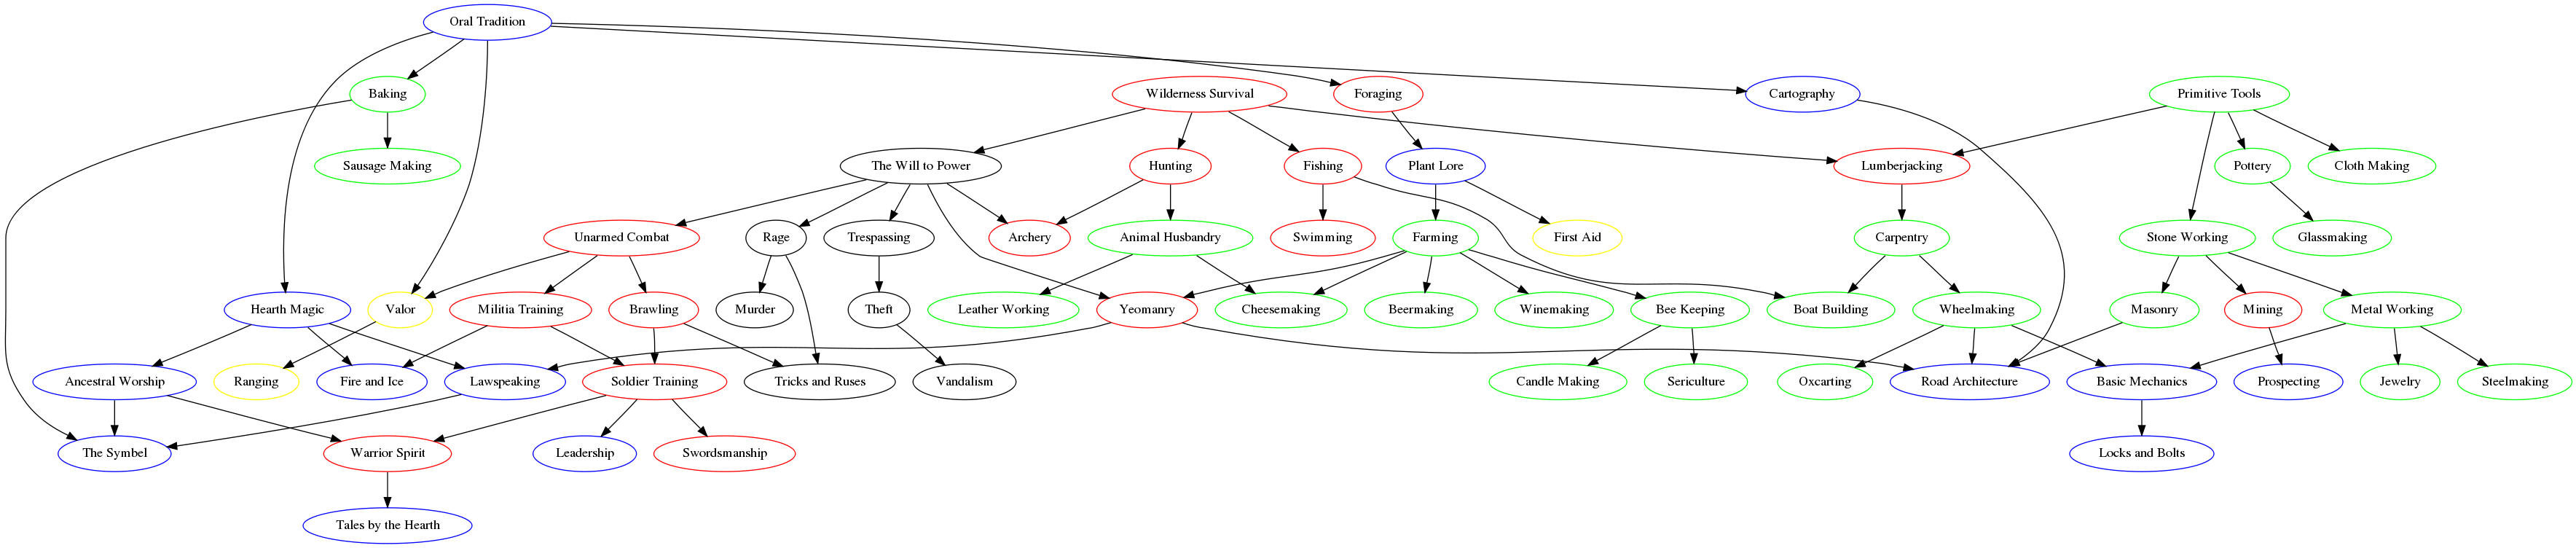
A skill tree is here: http://www.havenandhearth.com/portal/res/skills.png
Please note that a lot of this will have snippets from posts and other places...so before you yell at me for "not writing it"...its all good
Also note that this game is in the alpha stage of development and one must expect instability and complete game mechanic changes without notice
Chapter 1 (character creation) and 2 (user interface) will be covering the most basic topics of Haven & Hearth so if you are already experienced or have played a small amount and want to look at some of the more advanced topics and problems that players have then skip ahead a few chapters.
Chapter One: Creating Your First Character
Start by running the client by left clicking the "Haven and Hearth Play" Button located at the top of the website in the middle of the navigation bar.
It should work the first time and without issue. Some common issues that prevent it from running are what browser you use and whether or not you have an up to date version of Java. In Firefox you may have to right-click the button and open in a new tab (I do at least)
The client will start and present you with one option (create character) so I'm sure you can figure this part out
After you have pressed the button you will start in a small room with a chest, 2 characters, and you a small glowing orb. From here you can go to the plastic surgeon in the upper left to choose whether you want to be male or
female. Left-click moves you and right-click makes you interact with objects and people. The default is male but if you click him a second time you will become a female.
Next you must decide your character name. This can be done by talking to Germania in the upper right.
Finally before you leave up the ladder go to the chest to gain some VERY basic items including clothes, food, torches, and a fishing pole.
If your character dies in the game (yes there is a permanent death system which I will explain later) then there will also be a runestone in the room to the left of the plastic surgeon. I will explain How it works later.
Chapter two: User Interface
After you create your character and climb up the ladder you will appear in the stone circle of Brogdor beside a runestone. Now you can finally say you crawled out from under a rock and weren't
actually born.
In the upper left corner of the screen you will see a series of bars
Chat bubble
By clicking on the chat bubble you will be able to type a small sentence that will appear over your character in game.
when you type in the chat bubble anything that you can not see will not display when you hit enter
Red bar with heart: health bar
Health in H&H is unique from any game in that you actually have 3 health figures (scroll over the bar with the mouse to see). The first number is "soft" hp (SHP), second is "hard" hp (HHP), and the third is "max"hp (MHP).
The way the health system works is that SHP represents "flesh wounds" in game. When you are attacked or otherwise damaged this is the figure that goes down the fastest. When SHP runs out you become unconscious. While unconscious you can perform no actions and you can not chat. Damage to this is represented by red floating numbers.
HHP represents "mortal wounds". When you are attacked this value also can go down but at a much slower rate than SHP. When HHP reaches 0 you officially die. Damage to this is represented by yellow numbers. SHP can not be higher than HHP at any time.
MHP simply represents the highest your HHP and SHP can be.
SHP is restored over time and the rate this happens is determined by your stamina which is affected by your hunger status. This is usually something that does not take long. Your max SHP is determined by your current HHP.
HHP is much harder to restore. It does not happen naturally and can only be done in two ways. The first way is to learn the first aid skill and to apply gauze to yourself or have another player with the skill apply the gauze. Gauze restores up to a max of 10 HHP over time.
The second way is leeches. To find leeches you must first find a marsh. Then simply walk in the marsh and leeches will attach themselves to any open equipment slots you have. Leeches heal HHP much faster than gauze and are often the preferred method. Be warned though as leeches cure you by damaging your SHP. Leeches take 3 SHP and for each point they take they have a 10% of curing 1 HHP. If you run out of SHP they start taking HHP and can kill your character. Over time the leeches will become full and bloated and they will no longer hurt or heal you but will remain attached. They can be removed at any time by simply opening your equipment screen and taking them off like any other piece of equipment.
Blue bar with water drop: Stamina
The stamina bar represents your characters current energy level. When you perform actions such as crafting or fighting your stamina decreases. When your stamina is low you may not be able to perform certain actions and must wait till your stamina is restored naturally over time.
You can also restore your stamina by drinking tea
Green bar with chicken leg: Hunger
In Haven and Hearth your character needs to be fed just like a normal human being. There is ample opportunity for one to find food and food types can be found in the food chart. There are 5 levels of hunger represented by a different color of bar. They are (starting with fullest) overstuffed (red), full (green), hungry (yellow), very hungry (light brown), and starving (dark red). Your current level of hunger affects both stamina and health regeneration as explained below. To see your current hunger simply scroll over your hunger bar with your mouse and you will see two percentages. The first one represents the status of your current hunger level and the second number represents your overall hunger level.
Overstuffed (red): In this state you have eaten to much food and you will not be able to run at all.
Full (green): This is the ideal state and your character regenerates health and stamina fastest while full.
Hungry (yellow): While hungry your health and stamina regeneration will be reduced a small amount.
Very hungry (red): Health regeneration stops at this hunger level and stamina regenerates at an even slower pace.
Starving (dark red): When starving your health does not regenerate and stamina regeneration is unbearably slow. If you ever reach this state then food needs to be your number one priority.
Food Chart: http://havenandhearth.wikia.com/wiki/FEP_Table (right-click and open in new tab or window)
At lower levels your diet will mostly consist of apples and fish. These foods restore only a small amount of hunger and offer little in the way of food points, but later on with the cooking skill you can make much more complex foods that restore a much larger amount of hunger as well as giving much larger bonuses.
Black bar with smiley face: Happiness
Your happiness level is dictated mostly by your environment. When you do lots of work, stand in one area for to long, and get defeated in battle your happiness decreases. If you are unhappy the bar will fill red. Eating sweets and killing foes increase happiness. When happy the bar fills with green.
Happiness is currently not fully implemented and has no effect in game. There is currently no estimate for when it will be implemented.
Yellow stick figures: Movement speed
There are four levels of movement speed that you can choose by either clicking on the respective stick figure or you can cycle through them by pressing ctrl + r.
Crawl: At this speed you move extremely slow. You will automatically enter this state of speed when carrying large items or when overstuffed.
Walk: Your character will spend a large amount of time at this speed. You move at a fairly slow pace but you will not lose stamina while moving at this speed.
Run: When running your character will move at a fast pace and will slowly drain stamina. This is a good speed for traveling long distances and exploring. When stamina is below 25% you can not run.
Sprint: Sprinting allows your character to move extremely fast. The rate that your stamina drains while in this state is also very fast. This is best reserved for any sticky situation you may be in that requires you to escape. You can not sprint when your stamina is below 50%
Along the bottom of the screen there is a panel. Starting from left to right the panel has these elements:
Mini-map: Here you can see a small section of the map you are currently at. A full map can be found at this link: http://www.havenandhearth.com/portal/res/map.png (right-click and open in new tab or window)
The in game mini-map is currently limited in functionality. There are plans to improve this in the near future. On the full map each ring is a representation of the difficulty you may experience in that particular area. The farther from Brodgar you are the stronger your enemies.
Message panel: In the message panel you can private chat with other players. To do this simply right-click on a player and select the chat option. You can also have a party chat. Parties are made the same way you chat, simply just right-click on someone and choose the option to join or make a party. To switch between different conversations or messages simply click on the respective tab to the left of the chat window. You also craft items through the message panel and your combat status also is shown here.
A chat window can also be opened by pressing ctrl + c. This allows for a movable and extended chat window.
Action panel: In the action panel you can select combat moves, craft items, and perform a large range of actions. As you increase in skills more options become available so after you learn a new skill always see if you have anything new in the action panel
Quick slots and menus: Located above the message panel is a bar for assigning number keys to any number 1-0. To do this simply drag the item from your inventory or from your action panel into the respective slot.
Inventory screen:
In the center is a wheel that allows you to access many important pop up windows. The first on the bottom left (bag of gold) opens your inventory screen. This is where anything you pick up will be stored. You can also access this by pressing ctrl + i
Your inventory starts out fairly small but can be increased later by crafting or trading for a leather backpack.
Equipment screen:
Above the inventory screen button is a sword, shield, and robe. This is the equip screen. You use this screen to equip or un-equip items from your inventory. This is simply done by left-clicking items and then clicking on your paper doll in the center (to equip) or by left-clicking the item in its respective slot and placing it in your inventory or on the ground to un-equip. This panel can be opened by pressing ctrl + e.
The equip screen is currently not labeled so there is no surefire way of knowing what goes where in the equip screen. Tooltips may be added later for each slot
Character screen:
In the center is a button with a face which opens the character sheet. Upon opening the character sheet you will see your base attributes. These all start at 10 and can be increased by eating certain types of food. You can also enter this screen by pressing ctrl + t
Below your attributes is your “food points” bar. This bar fills when you eat food. Depending on the food you eat a different color will start to fill the bar. When the bar is full whatever foods you have eaten will affect the attribute that gains a level. The bar can become multicolored and when it is full it randomly picks one skill to increase (the larger a colors bar is the more likely it will be the attribute increased). This increase in skill from your food points filling the bar is called a “food event”
The attributes and there respective colors are as follows:
Strength (red): Increases melee and unarmed damage and gives +1 MHP per point
Agility (blue): Affects many combat skills
Intelligence (light blue): Affects the skill “Opportunity Knocks”
Constitution (purple): Each point adds 2 MHP
Perception (orange): Not currently implemented, will affect ranged weapons
Charisma (light green): Not currently implemented, will affect party based combat moves
The amount of food that is required for a food event is based on your highest attribute. So if you have 12 strength and 20 constitution no matter what you eat it will take however many food points it would take to fill constitution even if you eat only strength increasing food.
To the right of the attributes is the “skill values” table. Here you can increase your fighting abilities of unarmored, melee, or marksmanship. Below that you can see how many learning points (LP) you currently have along with your learning ability (the rate you gain LP from actions). To increase your fighting ability simply press the + sign of the respective skill and then click the “buy” button.
On the bottom of the screen is three pictures. The one on the left is of a crown and olive wreath. By clicking this one you get to the attributes screen that you are currently at.
The button in the middle of a cap and diploma is the skills window. In the skills window you can see your available skills to be purchased in the upper right hand window, skills you know in the lower right hand window and the skill description is in the large window on the left side. Chapter 4 will cover skills in detail.
The third button on the bottom is of a candle and book. This brings you to the beliefs screen. Your characters personal beliefs can greatly impact your game in many ways. You have the option to move one belief in a direction you want every 24 in game hours played (8 hours in real life). Here is a list of the beliefs you can choose from and there effects.
Death/Life
Effects of full Death:
-20% Maximum Health Points.
+20% Grievous damage.
Effects of full life:
+20% Maximum Health Points.
-20% Grievous damage.
Night/Day
Effects of full Night:
Regenerate health at 3x speed during nighttime.
Regenerate health at 1/3 speed during daytime.
Effects of full Day:
Regenerate health at 3x speed during daytime.
Regenerate health at 1/3 speed during nighttime.
Barbarism/Civilization
Effects of full Barbarism:
+30% Strength
+30% Constitution
-30% Intelligence
-30% Charisma
Effects of full Civilization:
-30% Strength
-30% Constitution
+30% Intelligence
+30% Charisma
Nature/Industry
Effects of full Nature:
Increased chance of getting 3 seed items every time you harvest crops.
Decreased chance of getting iron when you smelt iron.
Effects of full Industry:
Decreased chance of getting 2 seed items every time you harvest crops.
Increased chance of getting iron when you smelt iron.
Martial/Peaceful
Effects of full Martial:
+20% Damage
-20% Learning Ability
Effects of full Peaceful:
-20% Damage
+20% Learning Ability
Tradition/Change
Effects of full Tradition:
Learning Ability: 1/3 of normal.
Reincarnate at 100% of old character's skill values if your character dies.
Effects of full Change:
Learning Ability: 3x normal.
Reincarnate at 0% of old character's skill values if your character dies.
Time spent away from keyboard (AFK which is represented as little z's floating above your head) do not count towards play time.
Kinship screen:
The final button of the interface is the kinship screen on the right hand side of the wheel in the middle of your quickbar. By clicking the button with a heart on it you will see a window with 2 black windows. The one on the left is the list of people you have as kin (essentially your friends although if you are just starting then you most likely will have no one here). To add someone to your kin list simply right-click on them and select the "add kin" option. They will receive a message asking if they want to be part of your kin. If they say yes you can use the kin screen to always chat with them and party with them.


