Welcome to Azkanan's quick-guide to Haven and Hearth. I'm going to tell you what the menus are and what they do, and give you a quick guide on starting up.
Please make sure you read it all in order and don't skip, otherwise you're likely to duck yourself over.
I'll type the essential stuff in black, and the "additional" information in a grey colour. You should just read the black for now, then go over it again and read the grey.
Contents
- Main UI (User Interface)
- - Health, Damage and Restoring it
- - Stamina and its effects
- - Hunger and its Endless layers
- - Happiness
- - Travel Weariness
- The Dial
- - Inventory
- - Equipment
- - Character Sheet
- - - Abilities
- - - Skills
- - - Personal Beliefs
- - - Worship
- - Kin
- - Options
- The Buttons
- Starting Up
- - Controls
- - The Aim of The Game
- - The Guide
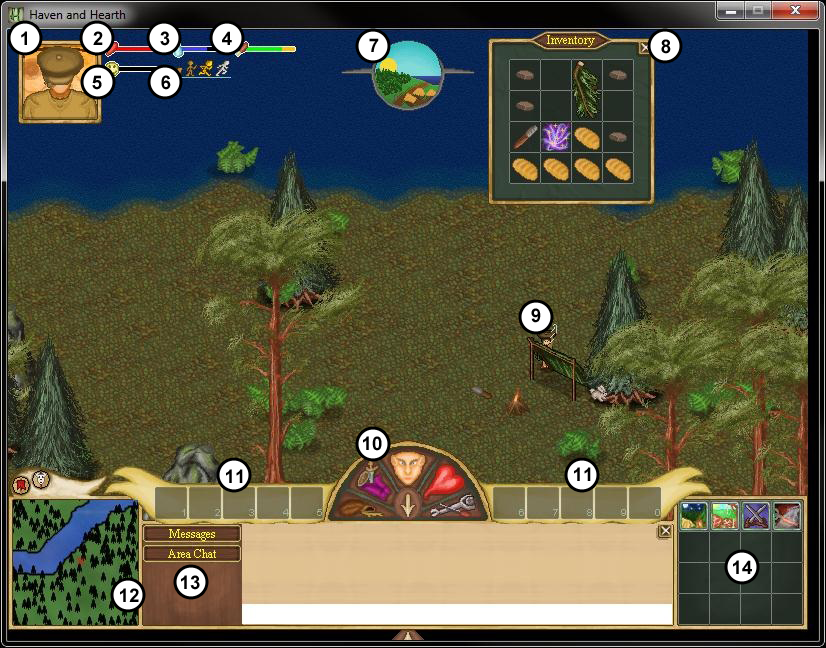
1. Your Portait
2. Health
3. Stamina
4. Hunger
5. Happiness
6. Speed
7. Time
8. Inventory Window
9. Your Character
10. The Dial
11. Quickkeys
12. Minimap
13. Chat Filters
14. Icon Menu
Main UI
On the User Interface, There's quite a bit of stuff; let's start at the top left, with that portait. That's you. When you equip certain items, you're portrait will reflect it (Your character, too) this is called "Paperdolling" in the terms of the programmer.
Health, Damage and Restoring it
The Heart is your health bar. It should be all red, which means you're as fit as a fiddle. There are two colours in your health bar, red and orange. When you are damaged, your red bar will decrease and will then heal up slowly - this is know as the SHP (Soft Health Points).
When your SHP hits 0, your "HHP (Hard Health Points) will decrease.
Your Soft HP will only restore as far as your Hard HP is, so if your soft HP hits 0 several times, your going to be in bad shape. When you hit 0, you'll get knocked out, indicated by a fallen character, and a whizzing "stars" around your head. you'll get up after a minute or so.
Now, the main way to heal your HHP is to take some first aid and fix yourself up, but you need some "Gauze" to do that. Which can be a bitch to get, so, for now, take the easy path and walk about in a Marsh or some Shallows for a while.
After a moment or so, you'll see "Leeches" on your equipment screen slots. These will drain your Soft HP by 1 and have a 10% chance to restore your HHP by 1 - be careful not to get knocked out by them or you'll lose a portion of your health.
The leeches will then be "Bloated" and make for easily-gathered fishing bait, later on.
Stamina and its effects
Stamina is the water-droplet image, the blue bar. Some tasks will drain your stamina over time, some moreso than others. As it decreases, you'll be forced to move to a slower movement and your hunger bar will decrease faster.
"Running drains no stamina on paved ground, and only drains stamina on forest terrain." - Noka
Naturally, your stamina will increase if you take a rest, moreso if you sit down on a chair. Stamina can be quickly increased by drinking water from a waterskin or flask. The quality of the water will affect how much stamina is restored and in turn will decrease your hunger accordingly.
Hunger and it's endless layers
Hunger. The chicken leg with the green bar. The green bar is nearly empty?! Oh no! I'm going to die!
This is the usual reaction from uninformed newbies. Contrary to dispopular belief, your Hunger bar will deplete several times, each time slower, before you die of starvation.
Overstuffed
Full
Hungry
Very Hungry
Starving
Overstuffed
This is where you and your fat ass ate too much, and now you can only walk at "Crawl" speed. Don't be so greedy.
Full
This is when you have played your cards right and have eaten well. Good job.
Hungry
This is where you should be whilst you're working or too busy to go eat, don't worry about it.
Very Hungry
This is when you should begin to make plans to go eat. This goes down pretty slowly, but it takes alot of food to refill if it really depletes.
Starving
I've never reached this stage, but I know it's the last bar stage before you die of starvation - avoid it.
"Starvation ticks off at your HHP, or the HP that, without being healed, will kill you. I don't remember by how much, but starving at all is badnews." - Noka
To quickly grab some food, go find a hearthland (Pink flowery fields) and find a flock of chickens. They are slower than you, if you run after them, and one herd can easily fill you.
Speed
At the top left, there are little images of men moving, there should be four. The faster you move, the quicker your stamina will drain, and in turn the hungrier you'll get.
Crawl
This is when you are either lifting or pushing something or very tired, you move at half the speed of walking.
Walking
This is a leisurely pace, where you can move on your way and take in the scenery. It doesn't drain your Stamina.
Running
This is when you are in a rush and you're running about. It drains your stamina, so don't use it too much or you'll be tired all the time.
Sprinting
This is the fastest you can run. It drains your stamina incredibly quickly, so don't use it unless absolutely necessary.
Happiness
Ignore this. You're happiness means nothing.
Namely because it's a placeholder, which means it's for the future, and has no effect right now.
Travel Weariness
This I have built up to a full bar, but still havn't seen any effects from it. I believe that sleeping in a bed will reduce it, if the icon is annoying - may effect your quick-travelling distance able.
"Travel Weariness is basically how far you can quick travel. It's not a big deal until you get into cross-town commuting, since a full bar completely stops you from quick travelling (except for to your hearth fire). The ways to get rid of it are to:
- sleep in a bed (it's affected by the quality of the bed, ie a bough bed removes less than a sturdy bed, over time.)
- drink alcohol
- chew tobacco" - Noka
The Dial
The dial is that little selection of buttons on the top of that bar at the bottom of your screen. Yeah, that one, with the five icons.
Inventory
The inventory is the button, with the little leather bag for an image, on the left of the dial and is where everything you are carrying is viewable.
"It" means an item.
Left clicking will select it, and drop anything you've selected.
Right clicking will interact with it, if possible.
Shift-left clicking will auto-transfer it to another open window, such as a construction site or container.
Ctrl-left clicking will drop it on the floor - doing this in water will make it dissapear. Be careful.
Equipment
The equipment is the next button on the dial and is where all your equipped items are, and any attached leeches acquired from too much time in the marshes or shallows.
To equip an item, left click it in your inventory then left click your body on this screen.
To unequip an item, shift-left click its image in the boxes around your character.
Character Sheet
This is a bombload of information all about your player and there are four screens to it! When you open your character sheet, the "Abilities" will be the one to automatically open.
Abilities
<Will fill this when I have access to the game>
Skills
Here you can buy base skills that you will definetly need to acquire throughout the game, and view skills you already have. Clicking them will give information about the skill and what it does for your character and will show the LP Cost next to the "Learn" button.
Personal Beliefs
This is where you can set the beliefs of your character - don't touch it! Keep reading first.
You can only change these by one step every X hours. Once you buy a point, you can view how long it will take for the next purchase to be available by hovering over the now-grey banner at the top of the window, which also turns green when you can purchase.
It is advisable to put your points first into "Peaceful" which will increase how many Learning Points you recieve for everything you do that LP-related.
You can view a list of their effect Here.
Worship
Ignore this for now.
Kin
The Kin is the love-heart button. You can add new friends here, view your current ones and quickly see their online status.
First of all, make a secret in the left box. When you want to make friends with people, give them this secret and they will then be your friend, or "kin" - use this sparingly. Telling the wrong person can cause... "social" problems. That is, they may be pretending to be friendly, only to get your secret and then destroy you and your settlement/camp.
Likewise, if somebody gives you their secret, type it in the right text area next to the one you make your own secret in.
Left clicking a person your friend list will give some quick information on them. The candle next to their name on the list is their online status - a lit candle is online, whilst an unlit candle means offline.
Options
This you won't really need to know, but here's a quick run down;
General
<Will fill this when I have access to the game>
Camera
Here you can change your camera style. I suggest "Freestyle", which is default, for moving around on ground and "Pan-o-rama" (I think that's what it's called) for boatriding, it's easier and quicker.
Audio
Hehre you can set the volume and select if you want music on or off (There is currently no music available on the Vanilla client)
* Vanilla means the default, the uneditted and/or the unmodded. It's the official client.
The Buttons
There are four buttons at the bottom right of the screen, in a little RTS-game-like fashion.
Adventure
This holds special actions such as making fires, hearthfires, lifting, stake claim and so forth. You should probably click-drag lift and a couple of others to your quick keys to save time in the future.
Build
This menu holds stuff that needs to be built via construction site, such as boats, houses, carts and so forth - I don't want to ruin them all for you.
Combat
This menu is combat-related, I havn't done much in the ways of Combat as of yet, but it does seem to hold everything related to combat - as the name suggests.
Craft
Craft holds everything that is built without requirement of a construction site, such as cups, cooking, amulets and other such things that go straight to your inventory once completed.
Starting Up
When you first make your character and enter the game, you'll be in a small room with some NPCs. Click each and see what they have to say, then grab items from the chest (Controls below) and choose where you want to go (Also below).
Controls
Left Clicking will move your character.
Middle Clicking and dragging will move your camera (On some camera styles)
Right Clicking will interact with something at that location.
Ctrl + R will autochange your speed to a higher available one.
Ctrl + E will open your equipment
Space will minimize/maximise your User Interface.
Inventory + Containers
Ctrl + Left Click will drop the clicked item.
Shift + Left Click will transfer the clicked item to an open container/inventory.
<Post more if you know them, this is all I can think of for now>
The Aim of The Game
There isn't any set "Best" goal. Most people just do whatever they feel like doing. Maybe you want to be a ranger who wanders the wild near his encampment, living off the land, or maybe you wish to be the mayor of a giant city you settled. The possibilities are quite open to vindification, and it's up to you how you want to play. Map the world, see the world, make friends, become a master craftsman and so forth; all are down to you and your playstyle.
It is likely you will do all of them.
The Guide
Now, if you've read everything above, you will have realised that you need food. Food is very important. To get food, you have four options: Hunt, Forage, Farm and Fish.
You won't find seeds easily for now, so cross that one off. Fishing requires you to make more equipment for your Fishing Rod, so cross that one off for now, too. You gain far more food from cooking rabbits and chickens than you do for eating blueberries, so let's concentrate on that.
You start off with a good bit of bread, so you don't have to worry about food for now, but don't put it off. Our main goal is to gain food, but for now, let's make it easier to gain Learning Points.
First, open your inventory. Do you have ten squares available? If not, drop some stuff on the floor for just a moment by Ctrl + Left Clicking a few things - Do Not Drop The Beautiful Dream! These will disappear when dropped, but not if put into a container, oddly.
Go to a tree. Any tree near you will most likely do. Now, right click it to interact with it, and select Grab Branches. You'll recieve seven branches or so, now go do another tree till you have ten branches.
Next, we'll make a basket to put your stuff in. At the bottom right there are four options, which you should have read about above.
Select Build --> Containers --> Wicker Basket.
Moving your mouse over the viewscreen will show you a ghost image of your basket. Click somewhere.
Now when your guy walks over to it, a signpost pops up, which is a construction zone. If you walk away without putting any resources into it, it will disappear and you'll need to make another construction zone.
If your inventory is still open, great, if not, open it. Now, Shift Click your branches till 10/0/0 becomes 0/10/0 on the Construction Site Window.
10/0/0 means Requirement/On Site/Built. So, when you transfer the branches to the construction site, it'll show just that.
Next, hit the build button. Your character will then begin to build the basket - easy! Whilst the numbers are going from 0/10/0 to 0/0/10, open up your Character Sheet and don't move your guy! It'll disrupt the construction, and you'll have to go back over to it by right clicking the construction site, then hit build again.
Now, if you look at your Learning Points, you'll see them slowly increasing a little. By the time it's done, you should have somewhere between 20 and 100, I can't remember the basket's exact worth.
Put the stuff you dropped earlier into this basket, when it's done, by right clicking the dropped items, then right clicking the basket, then finally opening your inventory and Shift Clicking items to transfer them to the basket.
Congratulations, you've completed your first task. Now, make a Lean To, Campfire and a Spruce Bough Bed by doing the same process with the other required resources.
Build --> Furniture --> Leanto
Build --> Furniture --> Spruce Bough Bed
Adventure --> Light Campfire
Go do this now, then come back to this tutorial when done.
Back already? That was fast.
Ok so, you should have a pretty little camp by now. If it's night time, right click the campfire and get a fire going with Light Fire.
Alright, let's see... Oh, Right! Go to Adventure --> Lift, then left click your bed. Now right click your Lean To. A container screen will pop up. Left click an open slot.
Bam! Now your bed is inside the Lean To! How awesome, right? I jizzed when I did this the first time.
By now, you should have racked up some decent Learning Points. Go to Character Sheet then the Skills screen - not the list of skills on the Ability screen! Newbies make that mistake all the time.
Now, find Lumberjacking. Left click it. Learn it.
Awesome! We can cut trees now. If your Hunger bar is beginning to go below half on the orange bar, eat some Bread by right clicking it, either in your inventory or container and select Eat.
Otherwise, or if you did, either doesn't matter, let's move on. You can now Craft a friggin' axe! I'll leave you to find out where this one is, but I did just give you a clue.
You should also now be alright with the construction screen.
What? Oh, there's something new you don't recognise? Stone, eh? Alright. Wander around a little bit in the game, and look for a big rock sticking out of the ground. Yup, that's right, that's your source of stone. It's unlimited, too, so take as much as you want, although it's not going anywhere so take only what you need, to save on space.
Once you've made an axe, equip it by Left Clicking it on your inventory and then Left Click on your character in the Equipment screen - notice it is in his hand now? Pretty cool.
Right click a tree - chop it. This will take a moment. Soon after, the tree will collapse down into two or three Logs.
Lift these and take them to your camp, then right click it and Chop into blocks. Voila, you now have a bunch of blocks you need for other stuff.
Also, if you cut a tree down, you'll leave behind the stump. Removing this will give you four blocks and a hefty assraping of Learning Points, so go ahead. It does take a little while, though.
Come back when you have another 200 Learning Points.
Back Already? Godamn, can you not leave me be to drink my Proper English Cup of Tea in peace? Alright, let's see.
Open up your skills window again and look for "Hunting". Learn it.
Now, hunting doesn't generally require a weapon. Hunting, although, does unlock the ability to capture animals.
Do not chase after Bears, Boars, Deer or another other creature that is not small and fluffy - or feathery.
Your best bet for food is to locate some chickens, which are found in Hearthlands. They travel in herds, meaning you'll get a bunch of food from them and they're slower than you if you run after them.
If you havn't found any Hearthlands yet, don't worry, you can find rabbits hopping around in forests. The only problem is, they don't travel in groups, so rabbits can take longer to fill you, and they're quicker.
Protip: To easily capture something, Left Click The Prey First. This will move your character right up to them. If they run off, don't panic, they're just randomly moving. They don't even know you're there yet.
Before you go after a rabbit or chicken, make sure you have a 2x2 empty slot in your inventory so that you have space for it.
Now, when they stop, left click again and get as close as you can. Turn up your speed to the fullest, just in case, and then right click them. You should grab them, and they'll be in your inventory.
Once you catch it, Right click it in your inventory and Wringe Neck it. It'll make a sickly crack noise, and you'll have a dead bird. Or bunny. Either way, you're a murdering sick fuck.
Killing them is benefitial, because not only do they take up less space, they won't run away if you drop them, too.
Once full, take your food back to your camp. Stand by the fire and "Butcher" them. This will split them up into feathers, skin, bone and most importantly, meat. Other than the meat, I call it "Refuse", and it is mostly used in crafting.
Once you have a bunch of meat in your inventory, go to your fire and relight it if it went out, or build another if it is gone. First you have to move over to it with a right click, then right click it again to select it.
Then go to Craft --> Cooking --> Roast Meat. A craft menu will pop up and give you some details. Then all you do is hit Craft and it'll cook your prey. Job done!
Afterwards, you can craft your bone into a Bone Hook and the feathers into Flys. Or alternatively, you can make Wooden Fish Lures out of a Block of Wood.
But, there is still one item missing for fishing - the string! Now is the time to learn foraging.
Also, it is very worthy to increase your Exploration skill (On the abilities screen) up to 20 or more. The higher your Exploration skill, the more foragable things you'll come across in your travels. Now go exploring in the forest for Taproot. Taproot is used as string.
It doesn't need to be crafted into string, and is used autonameously as string, meaning it counts as string nethertheless.
Once you have a Lure, String and Hook, Left Click them in your inventory and right click your rod - they will then equip to it. You're now ready for the Fishing skill.
Equip the fishing rod and go look for water. Occasionally, you'll see fish jumping out. Look for fish near the coast, then go to Adventure --> Fish. Then, left click in the lighter coloured water - you can't travel in darker water, it's too deep. You should eventually wind up fishing and earning fish. Congratulations!
And that's it for my quickstart guide. I'll now turn you over to the Wiki, which will answer any other questions. I have below a List of Do's and Don'ts, and that's it from me.
The Wiki is found here.
That's All Folks!
Note - I'll add screenshots, eventually, when I get a chance. Alot to do in-game right now.
Do's and Don'ts
Do run away from bears and boars. They'll Knock you out.
Do be nice. There's no reason for you to be a dick in the game.
Do help people, not all the time of course, but if somebody is dying of hunger, passing by, he could become your best buddy for it.
Don't take the swimming skill. It allows you to swim, but you will more than likely drown.
Don't let your food stocks become empty. You'll suffer for it in the long run.
Don't settle on Riversides. Griefers patrol the rivers like hawks and will likely steal from you or kill you, if they can, just to annoy you. This happened to me the first time.
Don't attack Boars, Bears and Deer. Deer are argueably the toughest creatures in the game.
Don't right click rabbits and chickens from a distance. They'll just get a head start on you and could get away.


